Writing a check might feel outdated in a world filled with online banking, digital wallets, and tap-to-pay apps. But checks still matter—especially for things like rent, taxes, business payments, or sending a gift to someone who prefers paper over pixels. If you’ve never written one before or just need a quick refresher, you’re not alone.
A check might look like a complicated slip of paper at first, but it follows a straightforward layout. Once you understand each section and what it's for, the process becomes second nature. This guide breaks it down into six clear steps to help you write a check confidently and accurately.
How To Write a Check In 6 Simple Steps?
Step 1: Write the Date
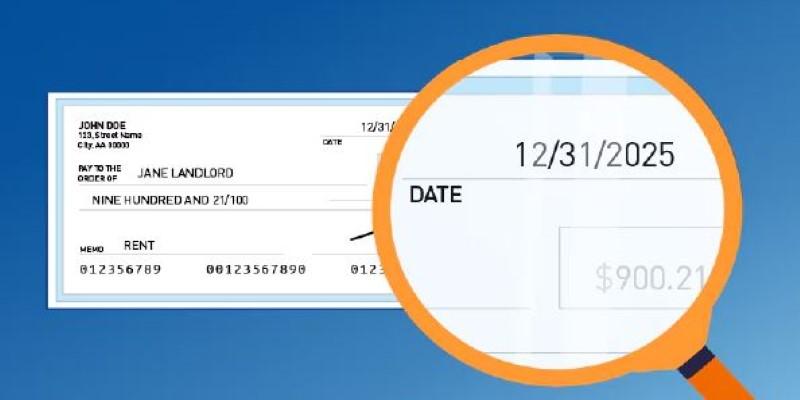
Every check begins with the date in the top right-hand corner. Use the current date in the format you normally write it—like "September 13, 2025" or "09/13/2025." The date plays a bigger role than many people realize. It lets the person or business receiving the check know when it was written. Some people choose to post-date a check, meaning they write a future date. This is legal, but banks can still cash it as soon as it's deposited, so it's not a guaranteed way to delay payment.
Writing today’s date also helps keep your personal records clean and in order. It’s one of those small habits that makes tracking payments and managing your checking account much easier over time.
Step 2: Write the Recipient’s Name
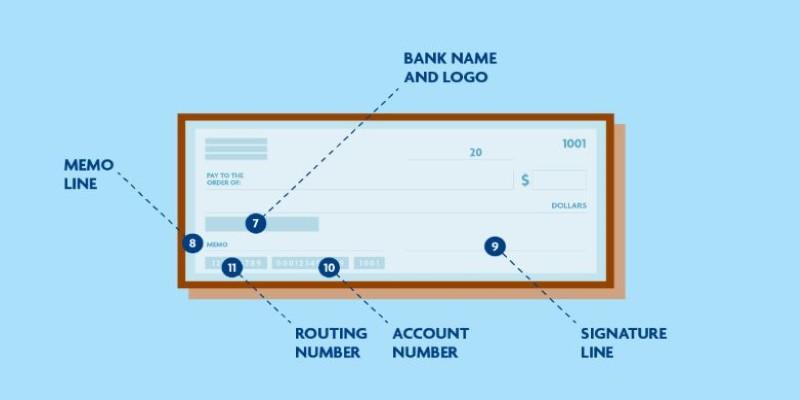
This goes on the line that says "Pay to the order of." It’s the full name of the person or business you're paying. Be specific and avoid nicknames. If you’re paying a company, ensure you use its correct legal or business name. Writing "Mom" won't work at a bank, even if she knows what it means.
If you’re unsure of the exact name, double-check. For example, writing “IRS” when the correct payee is “United States Treasury” could cause delays. Spelling matters here. An unclear or incorrect name may prevent the recipient from cashing or depositing the check.
Step 3: Write the Amount in Numbers
Look for the small box to the right of the recipient's name. This is where you write the dollar amount using numbers. For example, if you’re paying sixty-five dollars and twenty cents, write it as “65.20.” Be careful with your decimal placement, and try to fill the box from left to right to prevent tampering. Someone adding a “1” or a “0” in front of or behind the number can drastically change the payment amount.
If you’re writing a large amount, like one thousand five hundred dollars, don’t use commas in the box—just write “1500.00.” Keep it neat. A stray dot or curve might be misread by machines or cause a human teller to pause and question the check.
Step 4: Write the Amount in Words
This step is the most overlooked, but it's actually one of the most important. Writing the amount in words helps confirm the numbers and acts as a backup in case the written figures are hard to read or altered. The line directly under the recipient's name is for this part. It usually ends with the word “Dollars.”
Let’s take that same $65.20 amount. You’d write: “Sixty-five and 20/100.” Always start writing from the very left side of the line. If there's empty space left over, draw a straight horizontal line from the last word to the end. This keeps others from adding extra words or numbers.
If the amount is a whole number, such as $50.00, write "Fifty and 00/100." Avoid writing "Only fifty dollars," as that can leave gaps and increase the risk of fraud.
Step 5: Write a Memo (Optional, But Helpful)
The memo line is in the bottom left-hand corner of the check. It’s not required, but it can be useful. It tells the recipient—or you—what the payment is for. You might write “September rent,” “Invoice #113,” or “Birthday gift.” If you’re paying a bill, the company may ask you to write your account number in the memo line so they can match the payment correctly.
This small note can save you from confusion later, especially if you keep copies of your checks or check your transaction history and forget what a specific payment was about. While the bank won’t verify this section, it adds helpful context to the transaction.
Step 6: Sign the Check
Your signature is what makes the check valid. Without it, the check can’t be cashed or deposited. Use the signature you have on file with your bank. That’s usually the one you provided when opening the account. Some banks check signatures, especially for large amounts or unusual activity.
Sign on the line in the bottom right-hand corner. Don’t print your name—use your natural signature. Avoid writing anything else in that area. Once signed, your check is ready to be delivered. Whether you hand it over in person, drop it in the mail, or slide it into a rent box, it’s now an official form of payment.
Conclusion
While digital payments are everywhere, knowing how to write a check is still a practical skill. It’s not difficult once you understand what each part of the check means and how to fill it out. Whether you're paying rent, sending money for school, or making a donation, a properly written check makes the process smooth and professional. Each of the six steps—from the date to the signature—has a specific purpose that protects both you and the person receiving the money. It’s a simple form of payment, but one that still carries weight and responsibility. And once you get the hang of it, you’ll never second-guess it again.